A: es,we can,but which be a little difficult, the size of the battery camera will be 21700,if you don’t know to choose, pls do feel free to Email our after-sale team to “support@anran-cctv.com”.
A: 5V 1A-2A mobile phone charger,pls note that the fast charger/high-speed charger isn’t support to charge the camera,which will damage the battery of the camera.
A: 1.Please make sure the USB charger is 5V 1A-2A, and the flashing charger isn’t support to charge the camera.
2.If the battery is exhausted, it is recommended to plug in the USB port on the laptop to charge
3.The instantaneous voltage is too high, the battery has entered a protection state, and the battery needs to be re-plugged”
A:If your camera is battery camera, pls note that the camera don’t work 24/7 and the battery camera only will work when someone is passing,so the camera will be in dormant state when nobody is passing it.
A: 1.It may be because the SD card is full and will not be automatically overwritten, please format the SD card in the APP
2.Please power off/shut down the camera before inserting the card
3.Please take out the SD card and insert it to make sure it is inserted correctly
A: Please try to remove the SD card from the card slot with small tweezers
If the SD card still cannot be removed, please send the order number and shipping address to us (Support@anran-cctv.com), and we will send you a replacement
A: When the SD card is full the camera will delete the earlier recorded video so you don’t need to format the SD card manually.
A: Please insert the SD card into the computer,then you can copy the video to the computer.
A: 1.We can try to take it out by following video link, which will tell us step by step:https://drive.google.com/file/d/1qV6y0rSYWb9fLXCLXvoH-qlrTbuhR6oS/view?usp=sharing
2.If the SD card still cannot be removed, please send the order number and shipping address to us (Support@anran-cctv.com), and we will send you a replacement (A new SD/A new camera).
A: Please make sure the SD card is FAT 32,the class is 10;and pls format the SD card in computer before you insert into the camera.
A: Our camera supports Micro SD card, the format is FAT32 Class10, the capacity of SD card is 16-128G
A: No, the camera doesn’t come with the SD card, you need to order one by yourself; Please make sure the format of the SD card is FAT 32,the class is 10.
A: 1.Please follow the below step to format the SDcard to FAT 32 format.
Insert the SD card into the card reader
and insert the card reader into your computer
Click the Start Menu.
Click This PC.
Right-click the USB Drive.
Click Format.
Click Start. If the File system isn’t listed as FAT32, click on the drop-down menu and choose it.
Click OK.
2.What is the brand of your SD card? Some brands of SD card brands are not compatible with our camera
3.Please power off/shut down the camera before inserting the card
4.Please take out the SD card and insert it to make sure it is inserted correctly
A. 1.Please check the permission to receive SMS messages enabled when you installed the APP
2.Please check spam in Email-box
3.If you still cannot receive the verification code, please register an account again
A. we need ensure whether the camera is far away from the wifi router,meanwhile, pls provide the virtual ID of the camera in phone app, then we can ask the engineer to pust the firmware to update the camera to have a try.
*Check Original Page: How to Match Code the Wireless Camera that have network port to NVR?
If your camera has a network port, please follow the steps below to match code the camera.
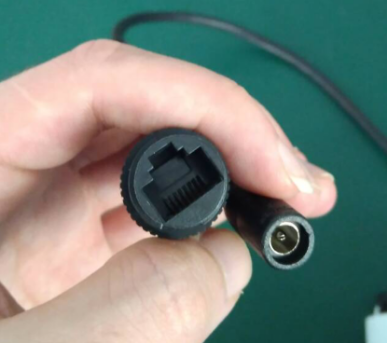
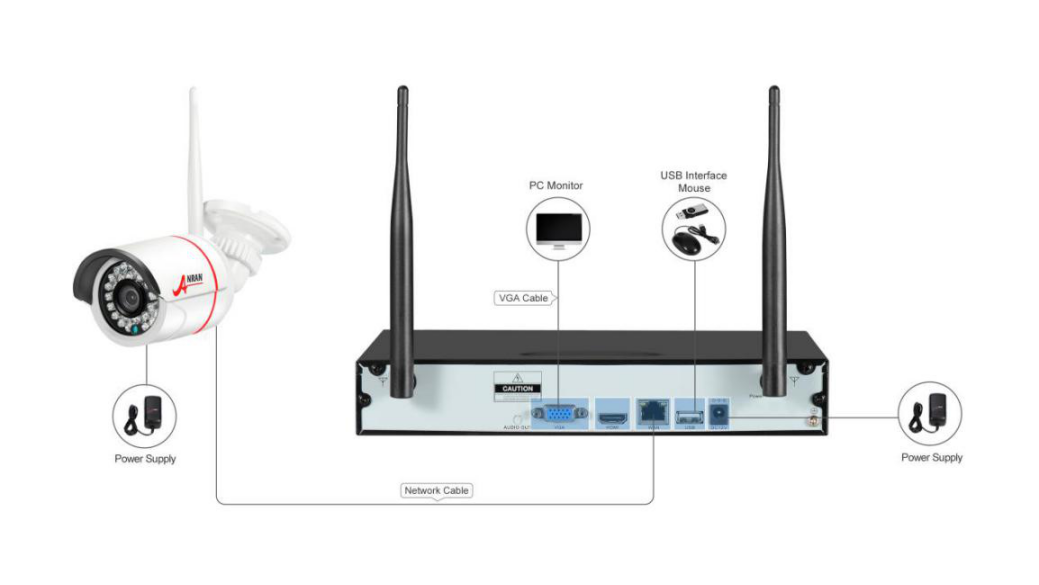
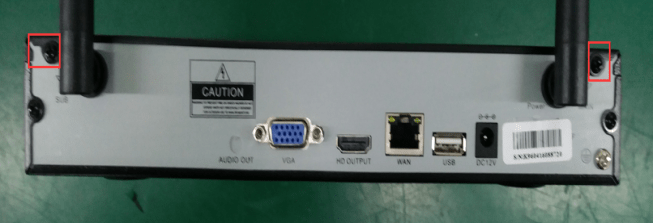
Please refer to below picture to connect the camera to the NVR.
Install antennas for cameras and take it close to the NVR; Then plug the camera to power adapter and use a network cable to connect the camera to NVR’s LAN port.
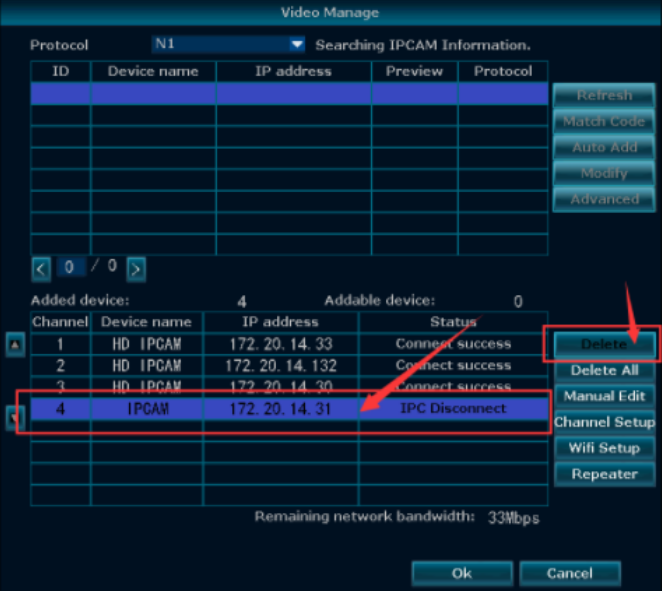
Before match code please delete the corresponding channel to spare a channel out for a new camera, then you can match and add new camera into the channel.
Match code the camera, you need to put the camera next to the NVR
1) Please attached a camera to the NVR (use a net cable) and the camera needs to be connected to the power supply
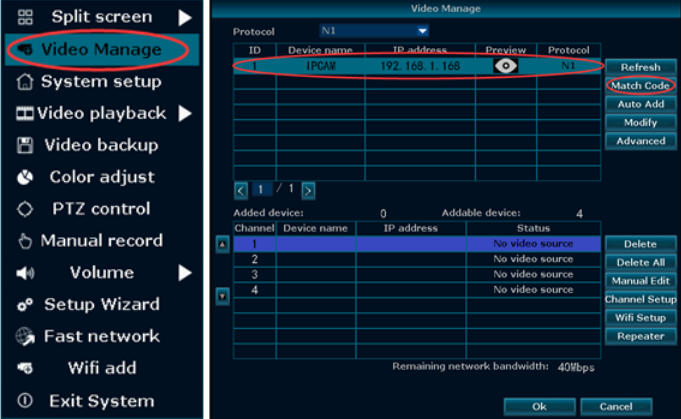
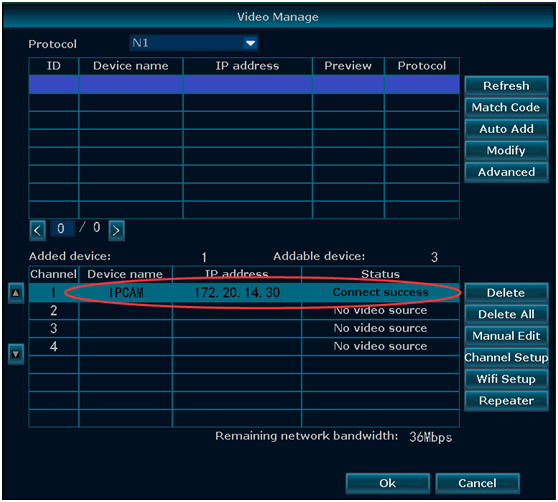
2) Right clicked to “Video manage”
3) “Refreshed” to allow the NVR to find the attached camera (The camera’s IP on the above box must be 192.168.x.x)
4) Found a blank line in the lower section
5) Clicked on “Match Code”
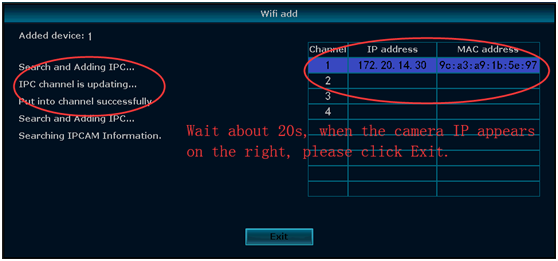
6) Wait for about 30s and the camera connect success (camera’s IP 172.20.14.x)
*Check Original Page: How to set up wireless camera system Email alarm?
Please click here learm more about setting email alarm: email alarm
*Check Original Page: How to install a hard disk drive on NVR?
There are several requirements of hard disk drive (HDD)
1. The disk had better be the one used for survilliance, not for computer use.
2. The type should be SATA. SATA2(3GB/s) or SATA3(6GB/s)is recommened. If you connect a USB stick or drive to USB port of DVR, DVR can back up video from internal hard disk drive to USB stick, but can’t record to USB stick directly.
3. We recommend 5400 RPM.
4. size is 3.5” .
5. The capacity should be less than or equal to recorder’s maximum capacity.
Note: Before installing the hard drive disk, please power off the system if it is on.
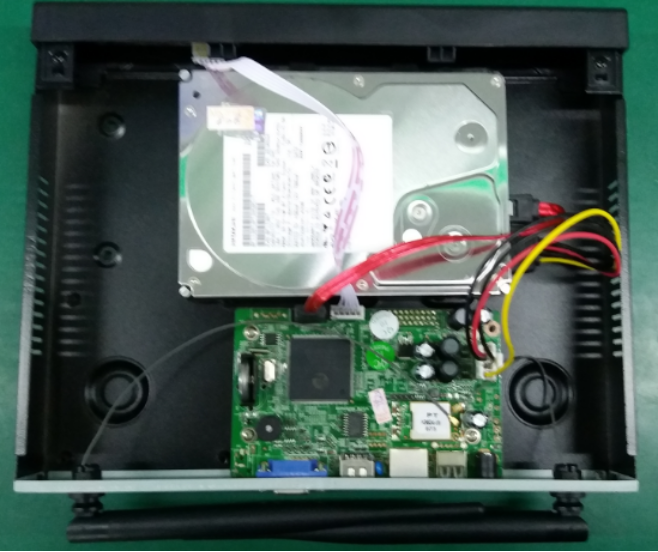
Step1. Loose the two screws which are fixing the box cover.
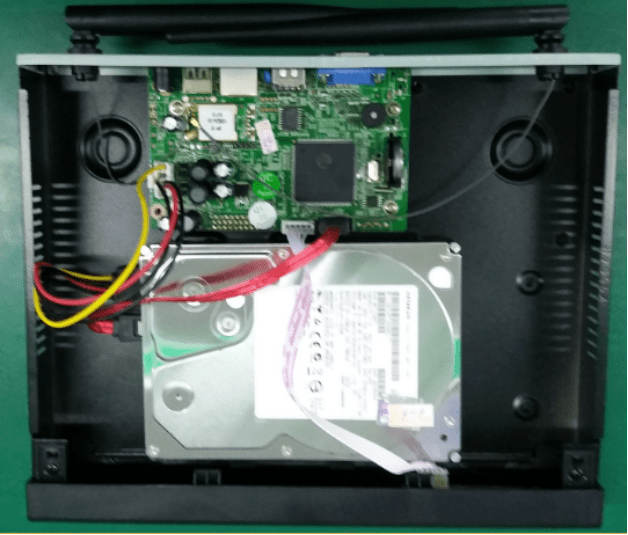
Step2. Push forward the cover to the end and remove it.

Step3. Connect the hard drive to the nVR System

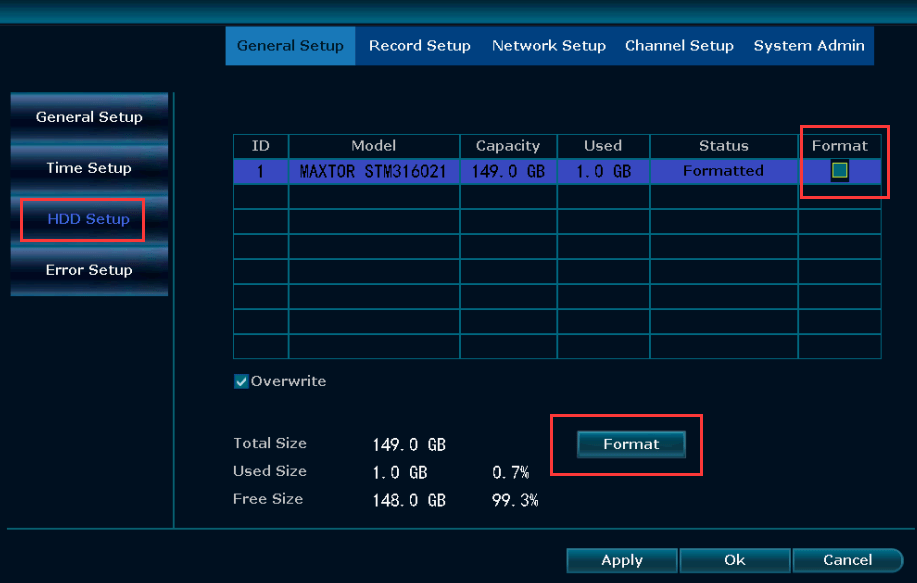
Step4. Turn on the NVR and check if it detects the hard drive.System setup—>General setup—>HDD setup,
Then, click format and format HDD,Final,power off the system.
Step5. Fix the hard drive inside the box.
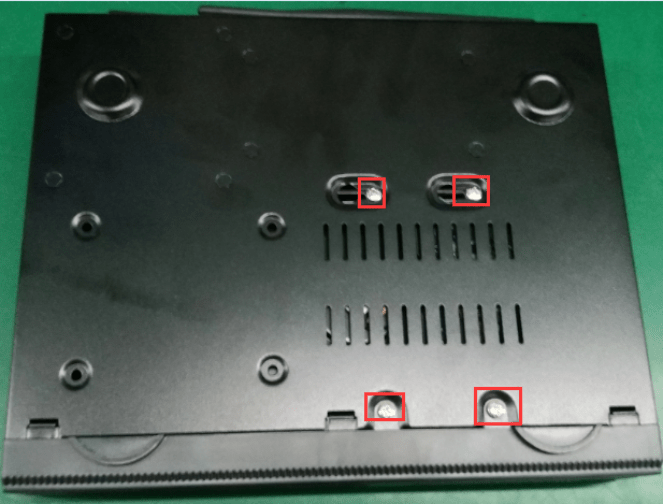
Step6. Put the cover back to position and install the screws.
*Check Original Page: Viewing Wireless Camera System on Computer by IE
You can view camera on computer or Laptop by IE in locate or remotely.
Step1. Open IE browser on your computer or Laptop, go to “www.dvr163.com”. (If you don’t have IE browser, please download it first)
![]()
Step2. Choose English first, Click User name login→ Input your username and password →click login. If this was the first time that you use it, please click “New account” to apply an account.
Tips: If you have an account on your phone APP, then you can use the same account to login.

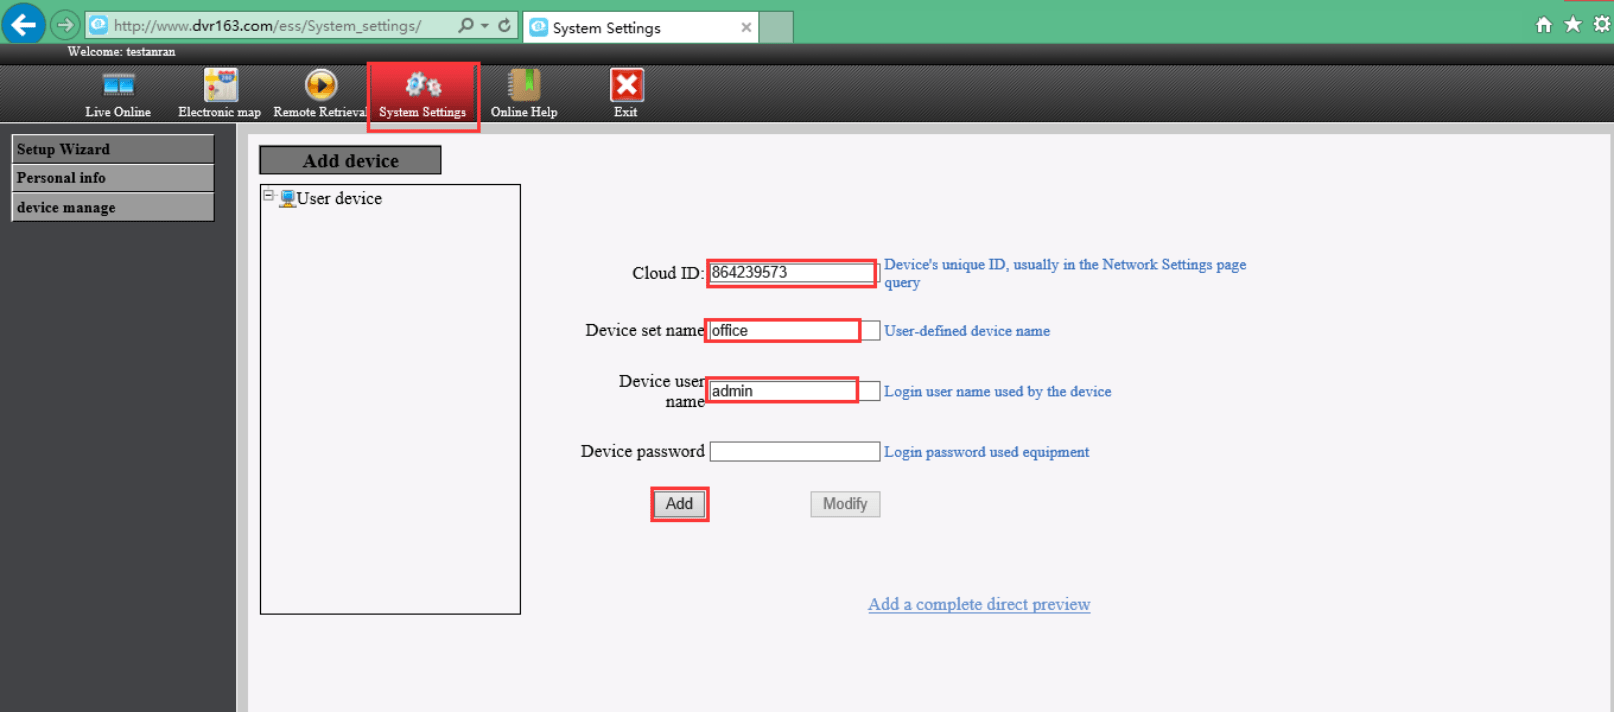
Step3. Input the following information and click “Add’’ to add the camera systems.
Cloud ID: Please input your Cloud ID (find it in the NVR’s Network Setting, or right bottom corner of the screen).
Device set name: Name it yourself.
Device user name: This is NVR system’s default user name, if you hadn’t changed it, it should be admin.
Device password: This is NVR system’s default password, if you hadn’t changed it, it should be blank. If you have modified the password, please enter the password which you had set.
Tips: If your APP account has already added the camera system, please ignore the step3 and you can follow step4 directly.
Step4. Click Live Online and Click install Update Controls. When you install the plug-in file, please choose the English language.
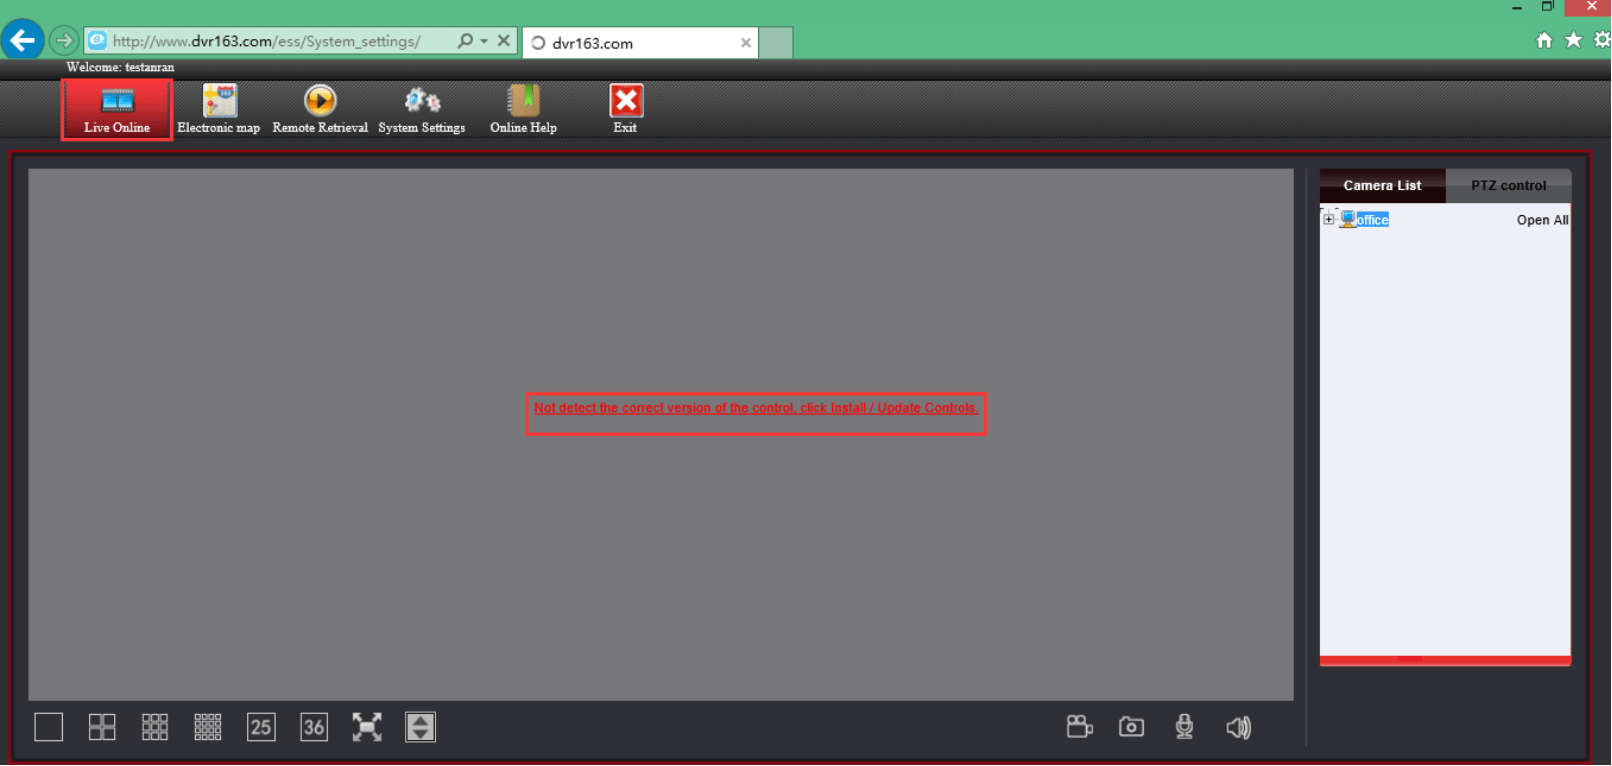
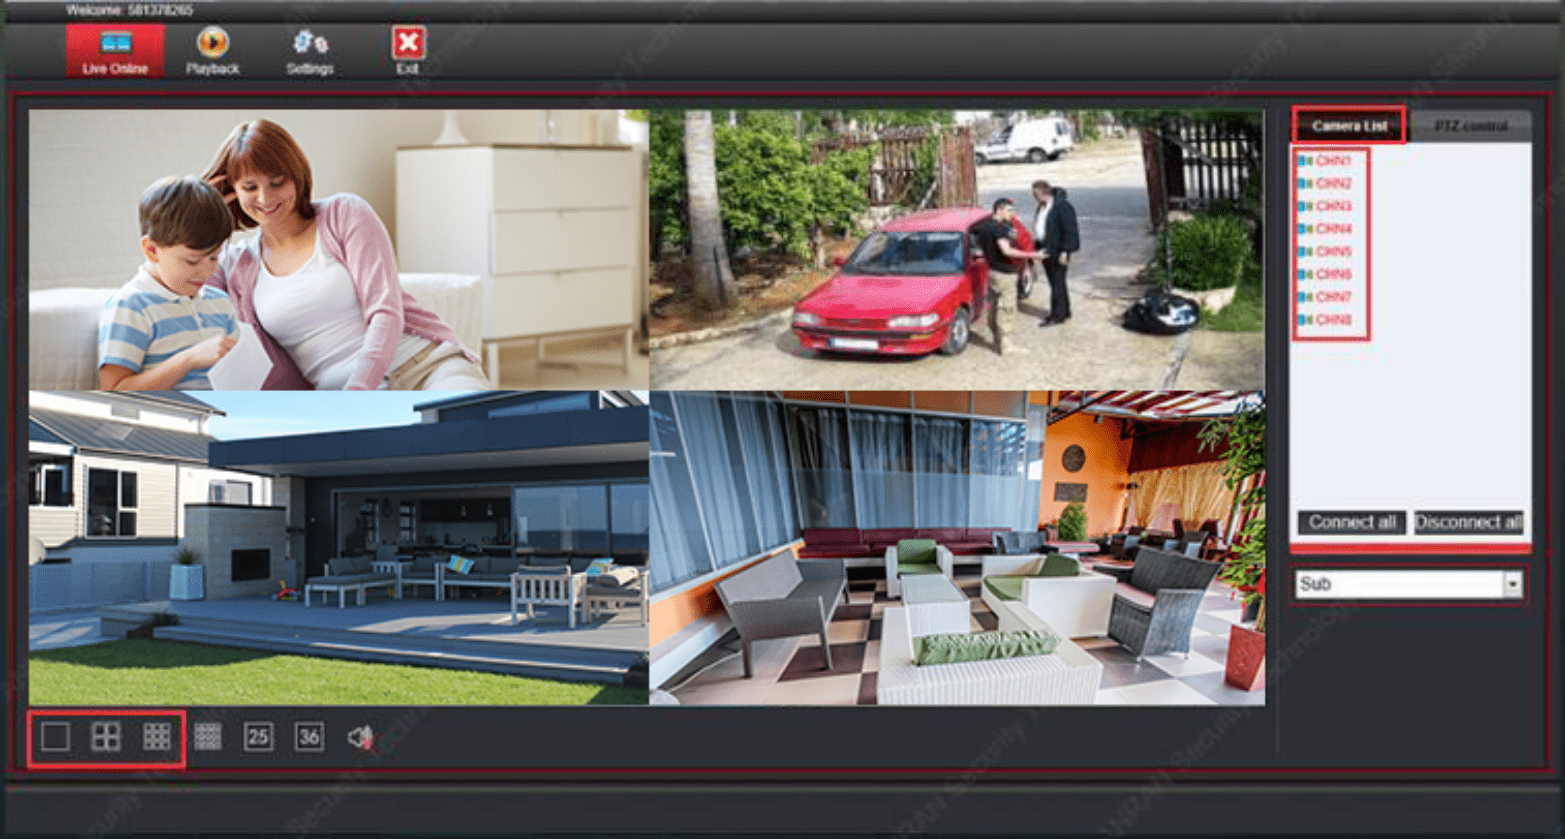
Step5. When you have finished installing the plug-in, please click Camera list, then you can view your video now.
*Check Original Page: No Video Output on the Monitor/TV from Wireless Camera System
If there’s no video output on the monitor from camera system, there are several possible causes for the problem, you can refer to the following solution:
1. The video output resolution of the camera system is not supported with the monitor/TV
*Please use your TV remote control to switch signal source. If the signal source is right but still can’t get camera screen, this is typically caused by resolution compatibility issue.
*The NVR default resolution is 1280×1024. If monitor can’t show any image of cameras, it can prove the display resolution of NVR is higher than your monitor’s, please adjust the resolution of your monitor to 1280×1024 or use a higher than 1280×1024 resolution monitor to connect NVR. (The monitor’s resolution must be higher than the display resolution of NVR. If not, monitor is not able to show any image of cameras).
2. The monitor/TV or VGA/HDMI cable is defective or damaged
*Please use another HDMI/VGA cable connect camera system with TV/monitor (shorter than 15 m).
*Please use another TV/monitor connect camera system and try again.
3. Camera system cannot be turned on
*Please change the power supply or outlet (12V-2A or 3A is for NVR, and 12V-1A is for camera), use another working power supply and check whether it works normally or not. If the power supply is damaged, the power will be insufficient, resulting in the system unable to run and no video.
*Don’t connect camera system to wifi router and then check whether it working or not.
*Remove the hard disk (also don’t connect NVR to wifi router, only connect a monitor), and then restart NVR, check whether it working or not.
Learn More:
Please go to your monitor, and press and hold the left mouse button for 15 seconds and then release it. After two minutes, the recorder will restart. Restore to default resolution
*Check Original Page: What should I do if I forget Wireless Camera System password?
Our Wireless Camera System’s NVR default user name is admin, and default password is no password (means you do not have to input anything).
1. If you forgot the new password created by yourself or the default password could’t work, please follow below video link to change password to default.
VIDEO
2.If method 1 doesn’t work, please tell me the time in the lower left corner of your camera system on monitor (send a picture is best), and then we will send you a super password. Please send email to this emailbox: support@anran-cctv.com

*Check Original Page: How to upgrade the Wireless Camera System?
Please send your camera system version info to our support team, and then they will send you the latest upgrade firmware.
support emailbox: support@anran-cctv.com
*Check Original Page: How to Match Code the Wireless Camera to connect with NVR?
1. Please put the camera next to the NVR, and connected the camera to the power supply
2. Please go to “Video Manage” and delete the “IP disconnected” camera from below.

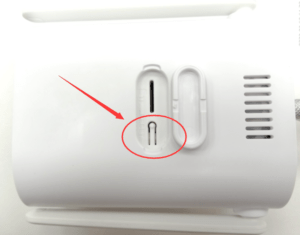
3. Press the camera’s reset button for 13-15 seconds (the button next to the camera’s power cord) and then wait about 1 minutes. The camera automatically restarts.

4. Right click–and then click “Wifi add” to Match Code the camera


5. Press the reset button 3s again, it will automatically search and add cameras
6. A few seconds later the picture will be shown on the screen
7. Click “Exit” after all cameras are connected
*Check Original Page: Wireless Camera shows “IPC disconnected”, “No video source”, “Connection failed”
*Please make sure the wireless camera and NVR are within the valid signal range. Do not install the camera too far from the NVR, otherwise the camera will “Connection failed” or “IPC disconnected” .
*Checking the power adapter and antenna, use another working power adapter and antenna for this camera and check whether it will work normally or not.
*Use your finger cover the camera sensor or place the camera in a dark environment to check whether the Infrared lights will turn on or whether you can hear a click sound. If not, please restore the camera to factory settings and try again.
*Match Code the camera again CLICK HERE

*Check Original Page: View Wireless Camera System on Computer Software “EseeCloud”
“EseeCloud” can help you to manage your NVR remotely. But before adding your NVR to “EseeCloud”, please make sure you have connected your NVR to the Internet successfully.
Detailed steps and video teaching. Click Here
*Check Original Page: View Wireless Camera System on phone APP
Step1. Download the APP and install it on your phone.
—-Please search “ARCCTV” in Google play or Apple store and install it on your phone.
Step2. Run the “ARCCTV” APP and register an account (for first time using) and then login.
Step3. Click the “+”, then click “Kit”—“add manually”


Step4. Add camera system-Learn More
Cloud ID: you can find it in the NVR “Network Setup”
User Name: default user name is “admin”
Password: Default password is nothing. no password.
Tips: If you have already set the password for your NVR, please input it. Remember it is the camera system password, not the APP login password


Step5. On your device list, click it to view the cameras.


Playback video on APP


*Check Original Page: How to Set Motion Detection for Wireless Camera System?
Motion Record. Motion Record means to record only when movement is detected.
1. Right click→System Setup→Record Setup→Record Plan. By unselecting “Time” and selecting “Motion”, the channel will record only when motion detected (Click “Reset” and you can reset the default settings. Long press the left mouse button in the box and drag it, you can quickly set up the recording plan).

2. Go to NVR system, right click the mouse: System setup→Channel Setup→Video detection. Check Enable for Motion Detection
Channel: which camera you want to set Motion Record
Detection: choose “Motion” and need ticked “Enable”
Sensitivity: Sensitivity adjustment
Alarm duration: The length of the alarm recording
Arming time—click this button, which you can set the alarm time.
Area edit— click this button, which you can modify the motion detection area. (default motion detection area is all the image which camera can see)

*Check Original Page: System Initializing issue on Wireless Camera System
Stopped on the logo interface after rebooting and there was no response at all.

1. Please change the power supply (12V-2A/3A is for NVR, and 12V-1A is for camera), use another working power supply and check whether it working or not. If the power is defective, the power will be insufficient, resulting in the system unable to run.
2. Please don’t connect your camera system to your WiFi router and then check whether it working or not.
3. Please remove the hard disk (also don’t connect NVR to WiFi router, only connect a monitor), and then restart NVR, check whether it working or not.
If your camera system working again, please upgrade your camera system in time.
*Check Original Page: Why does wireless camera system send so many email or APP false alert?
To explain this question, we need know the theory how motion detection works.
The NVR system can detect small image optical change. It can be triggered by small image change from camera. Image is transmitted by light signal.
Therefore, even if there is no object in front of camera such as human, animal or car, system may still be triggered by small light change such as floating cloud, shaking leaf.
Most customers hope the system can only be triggered by big object like people and ignore small movement. But based on the theory how motion detection works, there are false alarm.
It is hard to say the system is faulty since not only ANRAN brand system faces such issue, but also other brands who use light sensor to work for motion detection function.
How to reduce email and APP false alert?
1. To reduce false alarm, you can turn the sensibility to lower and set the alarm area. (The alarm area defaults to all areas have been selected.)


2. Click “Arming Time”, you can set the notifications time of email alert and APP alert.

3. Please upgrade your camera (you can upgrade it from the network server)
